Presentation and media
Learn how to add cover images, turn illustrations, character sprites, text effects, texting threads, emails and letters, and immersive mode to your Imagina world. Covers the built-in generators and Image Lab.
How you present a world shapes both who stops to play and how the story feels once they do. The title card is your storefront: it appears as a thumbnail on the front page and as the hero image on the world page, so it must read at a glance and signal genre and tone to someone scrolling past. Once a player is inside, turn illustrations, text effects, character sprites, and immersive mode do the work of immersion: showing a dramatic reveal, changing how a phrase feels on the screen, or turning dialogue into a visual-novel stage.
Add an image or an effect when it shows something the prose alone cannot, and skip it otherwise. You need a title card to publish. Everything else on this page is optional.
Tools for creating images
There are two ways to get images into a world.
- Built-in generators. The world editor generates a title card, a play background, character portraits, sprites, and location images from what you already wrote, and the story generates turn illustrations from what is happening in the scene. These are the primary tools, and most creators never need anything else. Each generator offers an image model and an art style. Some models come with an hourly free allowance, paid models charge credits per image, and sprite generation charges per sprite that succeeds.
- Image Lab. A standalone generator at
playimagina.com/image-labfor focused, prompt-driven work: engine selection, prompt modes, poses and framing, art styles, reference images, aspect ratios, a detail pass, and advanced controls such as negative prompts, steps, and seeds. Use it when you want full control over a specific picture, such as the perfect cover, a portrait with exact details, or location art. It is open to signed-in accounts with mature content enabled in their profile. Anything you make there can be uploaded into the editor.
Cover images
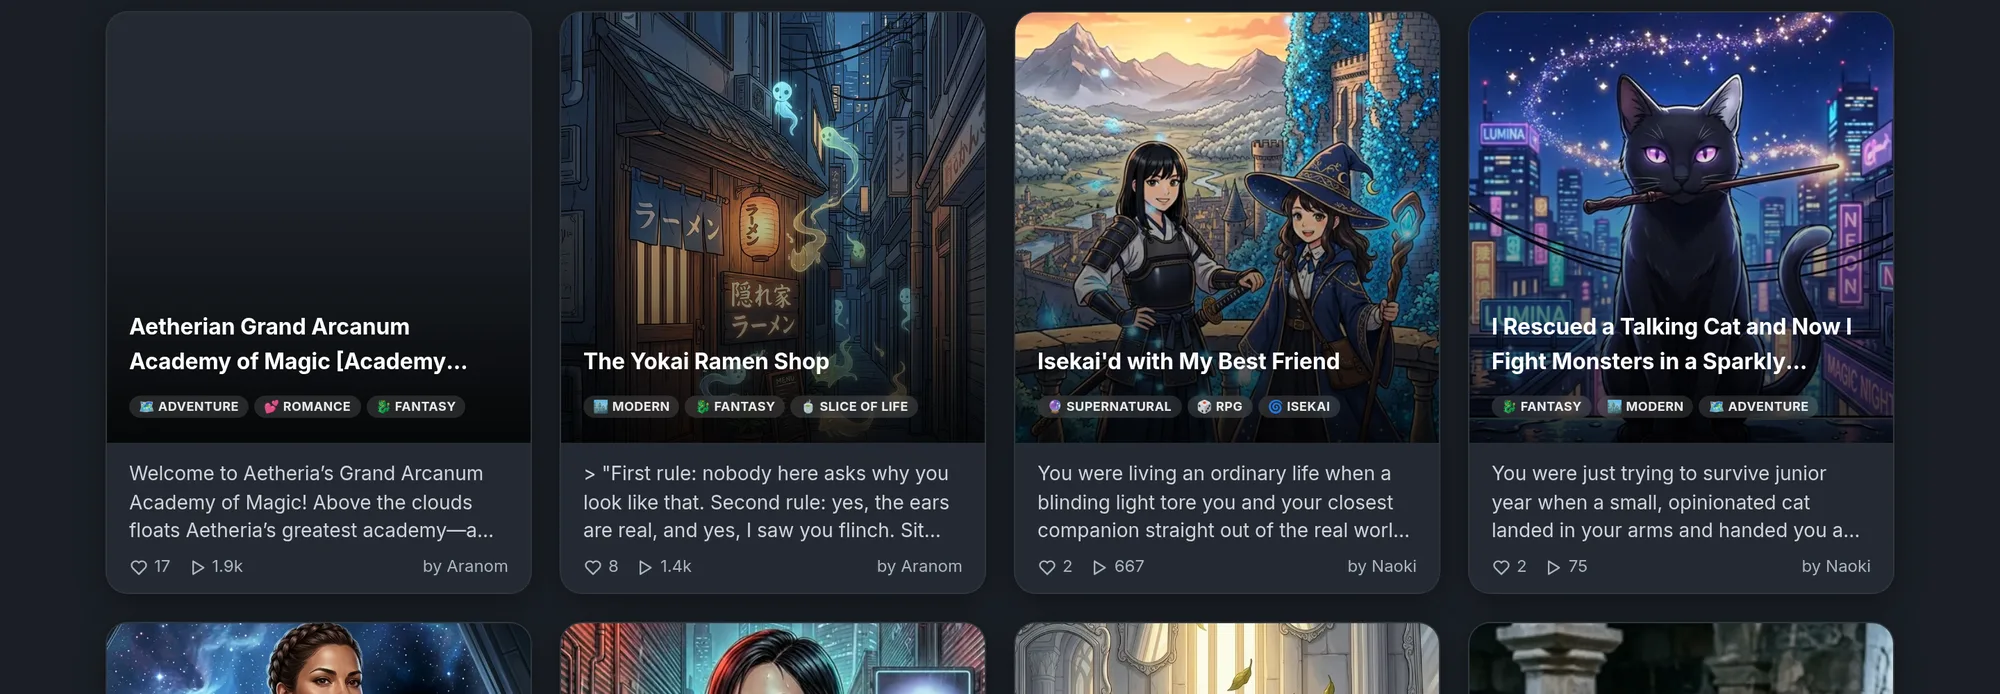
The title card is the world's thumbnail in Browse and the hero image on the world page. It is often the first thing anyone sees.
What makes a good cover. It signals genre and tone at a glance: a mystery cover looks different from a romance cover. One clear subject or a readable scene, no text overlay, and nothing so busy that it turns to mush at thumbnail size. Aim for the image a player would want to click.
The specs. Portrait, roughly 2:3, cropped by the editor to a fixed size unless it is already close to that shape. JPEG, PNG, or WebP, up to 12 MB. Everything is converted to WebP when stored, so a huge PNG buys nothing.
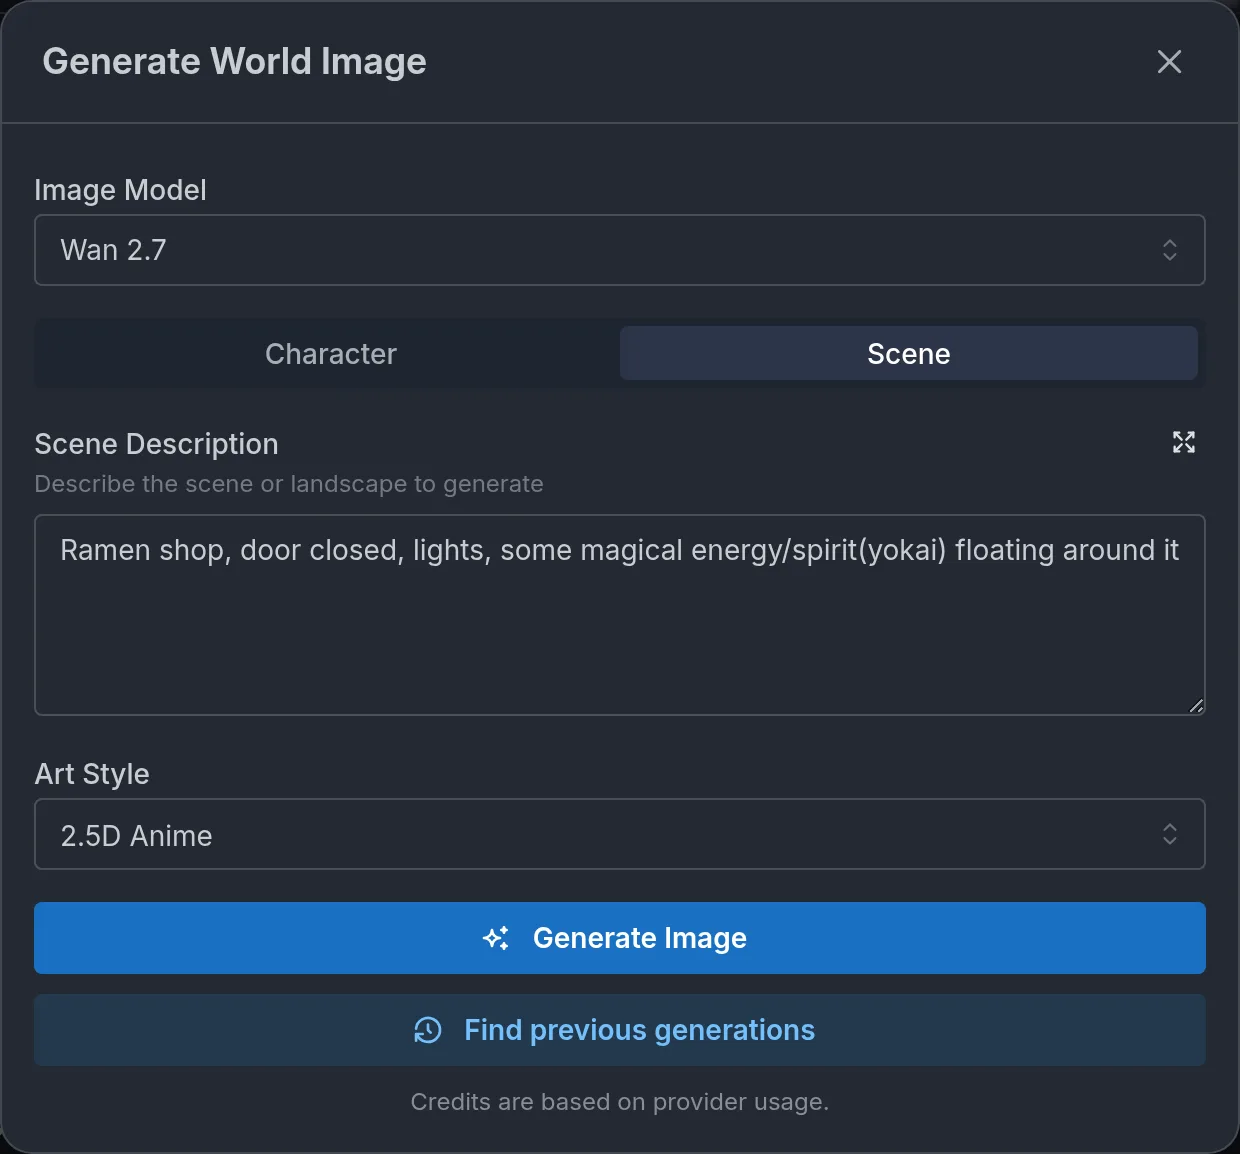
Creating one. Under Essentials → World Info, upload an image and adjust the crop if one is needed, or open the generator. It has a Character mode (appearance plus background) and a Scene mode, an image model picker, and an art style picker. For full control, generate in Image Lab and upload the result.
The same section holds the background image, a 16:9 landscape shown behind the story during play and required for immersive mode. An establishing shot with no characters and nothing that pulls the eye from the text works best.
Turn images
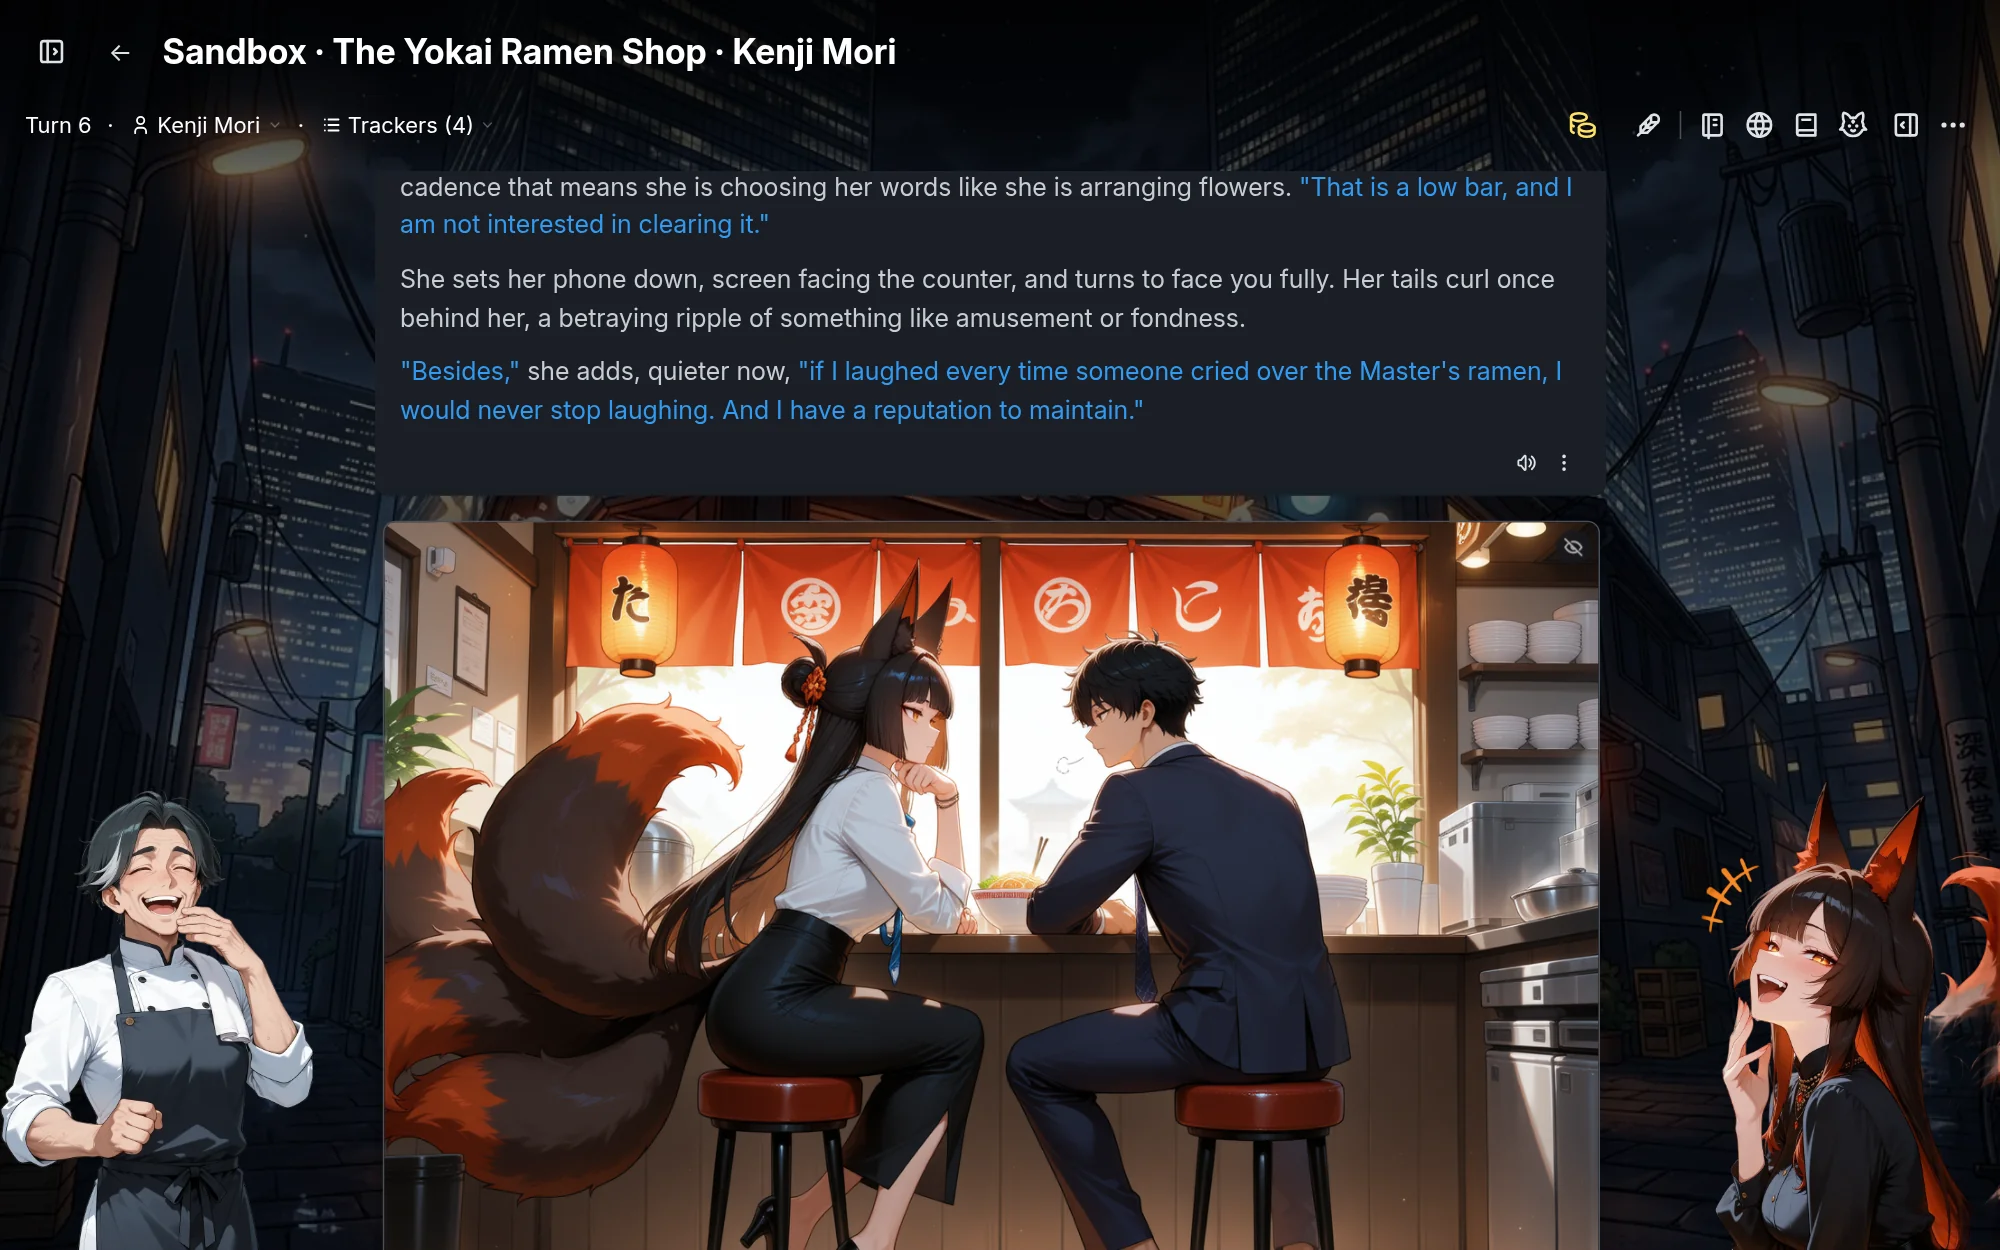
Turn images are illustrations the story generates at dramatic or visually striking moments: a first meeting, a reveal, a new location. They appear alongside the narrative, and the storyteller is instructed to use them sparingly.
Shaping them. Turn images are on for every world, so there is no switch. In the Turn Images section:
- Optionally add Image guidance, a short phrase of up to 100 characters that shapes both which turns get illustrated and how they look: "ghibli-inspired watercolor", "dark fantasy oil painting", "only illustrate combat and reveals".
- Set a Cooldown in turns between images. Two is a safe default. Lower it for image-heavy worlds, or set it to zero to allow consecutive turns. Raising it mostly limits cost, because the storyteller still decides which turns are worth an image.
The image engine and art style are the player's choice, not the world's: new journeys start on the player's account default (Imagina 1 unless they change it), and each journey can switch in its image settings. Image guidance is how you steer the look.
Layouts. Two, chosen automatically from what the storyteller asked for. A side inset floats a portrait of a person beside the prose, with the text wrapping around it. An inline scene is a wide shot displayed full width above the narrative, for environments, action, and groups.
Cost and control. Each automatic image costs a few credits on top of the turn (10 with the default generator, Imagina 1, or 25 when the player turns on character reference images). Images generate automatically unless the player has turned them off for their journey or account, and a player can generate or regenerate an image on any turn by hand. Image failures are silent and never break the turn. Journeys started before turn images were on everywhere keep the setting their world had.
When they work. Reveals, new locations, key action, a character's entrance. They shine when there is something worth showing. When to skip them: quiet dialogue, introspection, moments where a picture would interrupt the flow. A world whose writing style emphasizes visual moments gets better and more frequent illustrations.
Story beats can also force a scene image on a specific turn, or show a specific Extra Image or character gallery picture. See Beats and story arcs.
Texting threads
When your story involves messages, the exchange can render as a card instead of quoted text in prose: phone bubbles with the characters' portraits, a thread across a telepathic bond or a sending stone, an email in an inbox, or a letter on a sheet of paper.
When to use them. Modern settings where characters message each other: romance, drama, slice of life, mysteries where clues arrive by text or email. Also fantasy or historical worlds built around letters, courts and intrigue, telepathic bonds, or magical messaging. Leave the feature off if nobody in the setting messages or writes to anyone.
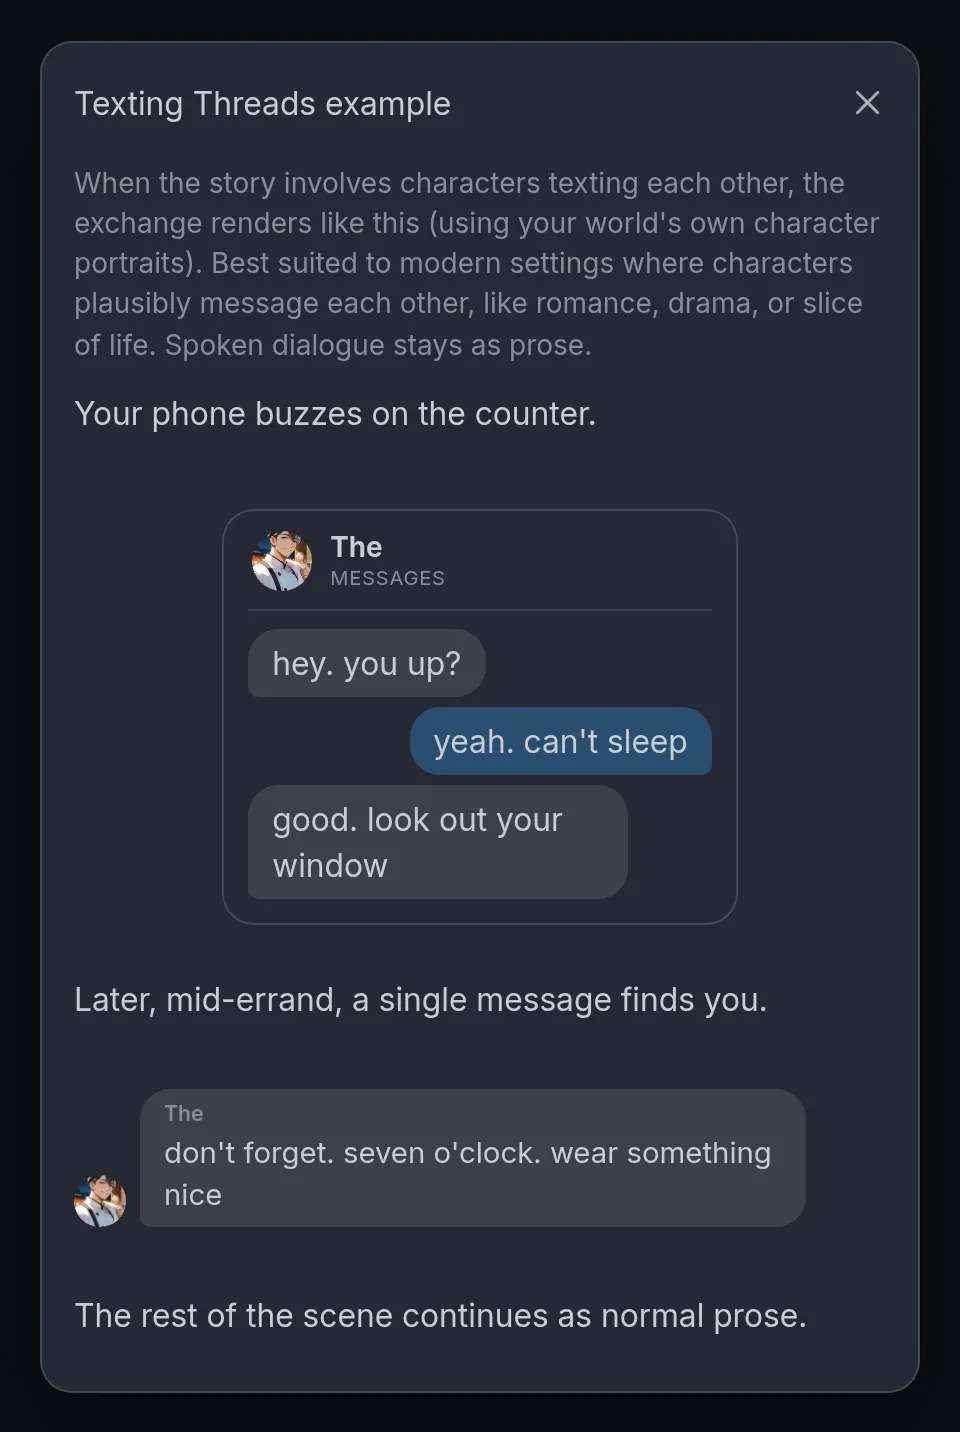
How it works. Open Images & display → Texting Threads and turn on Enable texting threads. A Show example link below the switch renders a live phone thread using your world's first NPC and their portrait. During play, the storyteller writes a short block when the scene calls for one and the play screen draws the card. Spoken dialogue, journals, inscriptions and signs stay as prose, and most turns have no card at all. A phone thread looks like this in the raw narration:
:::texts{with=Mika}
::msg[hey. you up?]
::msg[yeah. can't sleep]{me}
::msg[good. look out your window]
:::
Photos. A character can send a picture of themselves inside a thread: ::photo[Hinata in her evening yukata on the inn balcony, smirking] is a bubble like ::msg, with the same sender rules. Nothing is generated: Imagina picks the picture from the sender's sprites to match the caption, so the caption is a short neutral description that becomes the picture's alt text rather than visible text. A character without sprites sends their portrait instead, and with neither the bubble just shows the caption. A photo only ever shows its sender, a picture of a place or an object stays a caption bubble, and adult pictures keep to the journey's rating, arrive blurred until the player taps them, and stay hidden in discreet mode. The storyteller sends at most one photo per thread, and only when the scene calls for it, so give the characters likely to send one a sprite set.
Threads without phones. Add a skin to the thread when the channel is not a phone. Bubbles, senders and {me} work the same, only the look changes. A lone message outside a thread can carry a skin too: ::msg[look up, the lanterns are lit]{from=Mika skin=telepathy}. No skin means the phone look.
| Skin | Channel | Header |
|---|---|---|
skin=telepathy | Mind-to-mind speech | Mind link |
skin=stone | Sending stones, enchanted tablets | Sending stone |
skin=mirror | Scrying mirrors, magic glass | Scrying mirror |
Emails and letters. :::email{from="Aiko" subject="Saturday?" date="9:12 AM"}, the body, then ::: renders an inbox card with the sender's portrait, a "to you" line, the subject and the date. The body is normal story text. subject and date are optional, to=Name addresses someone other than the player, and from=me marks mail the player wrote.
A letter is the same card with skin=letter, or :::letter{...} for short. It renders as a sheet of paper, date in the corner, with the from name signed at the bottom automatically, so leave the signature out of the body. seal adds a wax seal with the sender's initial: red by default, or pick a colour with seal=navy.
:::letter{from="Aunt Mirabel" date="The 3rd of Frostmoon" seal}
My dear,

The apple tree finally bloomed. Come visit before the blossoms fall, and **bring your appetite**.
:::
Unknown and corrupted senders. Add masked when the player does not know who is writing, an unknown number or an unsigned note: no portrait shows, a masked letter goes unsigned, and the name on the card is only what the player sees, :::texts{with="Unknown number" masked} for example, or "Unknown" when no name is given. Add glitch when the channel or the sender's identity is corrupted (interference, a hacked line, a haunting): the name renders scrambled and no portrait shows. Both work on threads, single messages, emails and letters. With the switch on, the storyteller uses them itself when the story calls for it, and never puts a masked sender's real name in the markup.
Name the channel. With the switch on, the storyteller picks phone bubbles or a skin from the channel your world establishes, and uses an email or letter card when the player reads mail. It never writes the player's own mail for them, and it will not invent a channel the setting does not have. Say what exists in your lore or instructions: a telepathic bond, a pair of sending stones, a letter courier.
You do not need to write any of this yourself: the storyteller does it during play. You can hand-write threads, emails and letters in your introduction, though. The Markdown guide in the editor has the full syntax. None of it works in the world description.
Text effects
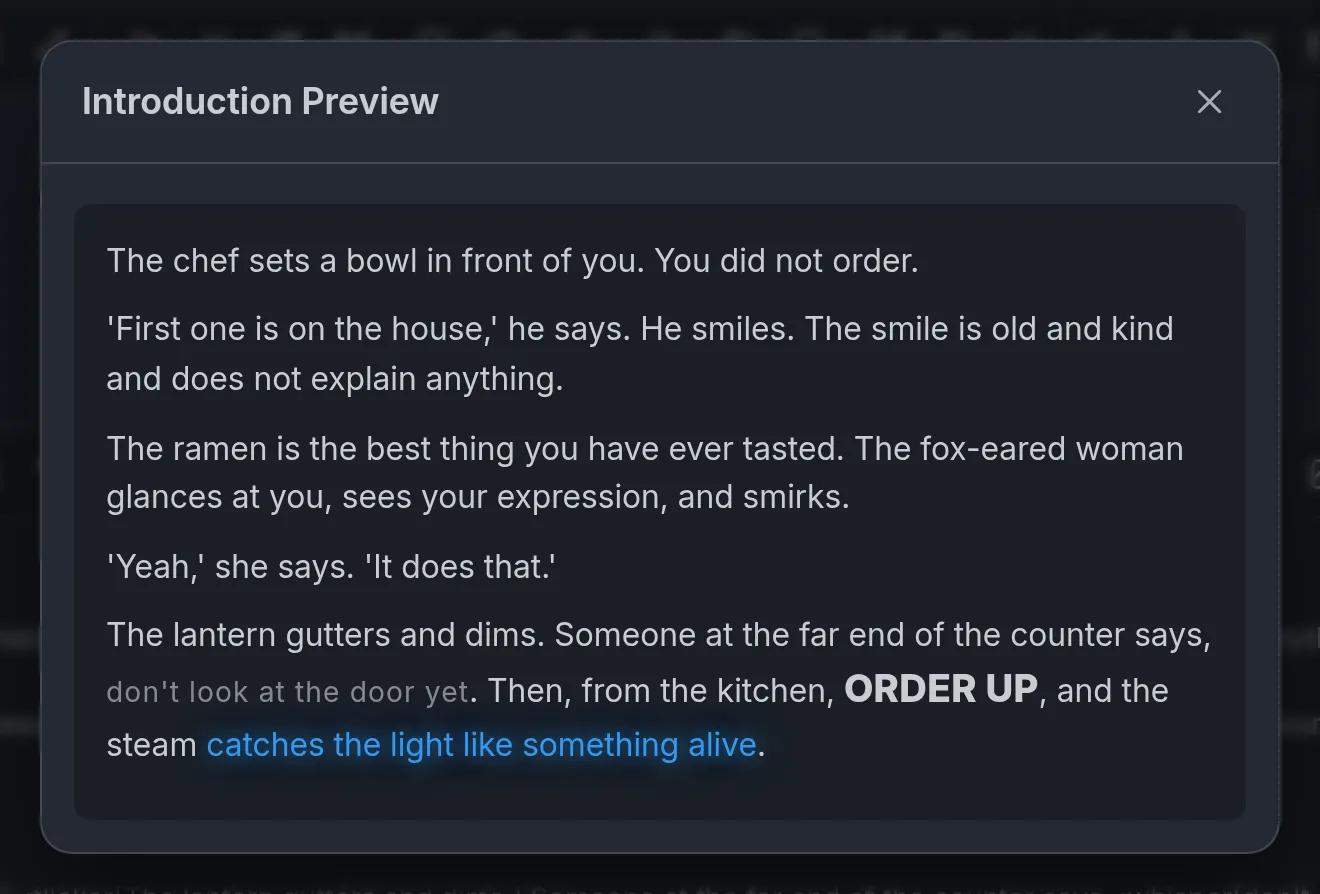
Text effects are inline flourishes that change how a phrase looks, not what it says: a glowing rune, a whispered secret, a word that glitches. Capable models use them in the narration, and you can use them in your introduction.
Open Images & display → Text Effects, turn on Enable text effects, then choose which categories fit your world's tone. The storyteller is only taught the effects from enabled categories.
| Category | Effects | Good for |
|---|---|---|
| Mystical | glow, burn, void | Magic, divine or supernatural moments, fire and rage, dark magic and cosmic horror |
| Subtle | whisper, shaky | Faint sounds, secrets on the wind, fear, cold, injury |
| Emphasis | loud | Shouts, war cries, thunderclaps, rendered bigger and bold |
| Digital | glitch, flicker, static | Reality breaking, dying lights, ghosts, corrupted signals |
| Altered | morph | A word cycling between its real form and a corrupted one, for hallucination, charm, or corruption |
The editor's cheat sheet shows the syntax for each, such as :glow[the ancient rune], and you can add a color or combine effects with bold and italic. Use them sparingly: one effect in a turn, and not every turn.
Players can turn animation off. A setting in the player's own preferences follows their system's reduced-motion preference by default, and can force animation on or off. Turning it off never changes the words. That is an accessibility feature, so make sure your story reads fine without the motion.
Player-facing details are in Why does the story sometimes glow or flicker?.
Extra images
Images & display → Extra Images is a gallery of up to 40 landscape pictures that belong to the world rather than to a character. They are never sent to the storyteller. You choose where they appear:
- In the introduction, with
::scene[label]on its own line. - In the description, up to three images placed from the editor toolbar.
- From a story beat's Show scene image effect.
- On an ending screen.
Two buttons add pictures. Upload takes a file from your device, or (on accounts with Image Lab access) opens a menu to Pick from the Image Lab. Generate opens the scene generator, with an image model and an art style; when your account can see adult content, it also offers a Generate NSFW switch, and a render made with it on is saved marked NSFW, so it only appears on adult journeys.
16:9 works best. Uploads are resized to fit a fixed landscape box, aspect preserved, and the gallery shows whether each image is used anywhere yet.
Maps
A world can carry a map picture, and any top-level location can carry a closer one for the places nested within it. Players open them while they play to see where the story is, with each placed location drawn as a pin. Maps are upload only, and the storyteller never reads them. Adding one and pinning your locations is covered under Locations in Worldbuilding and characters.
Sprites and character galleries
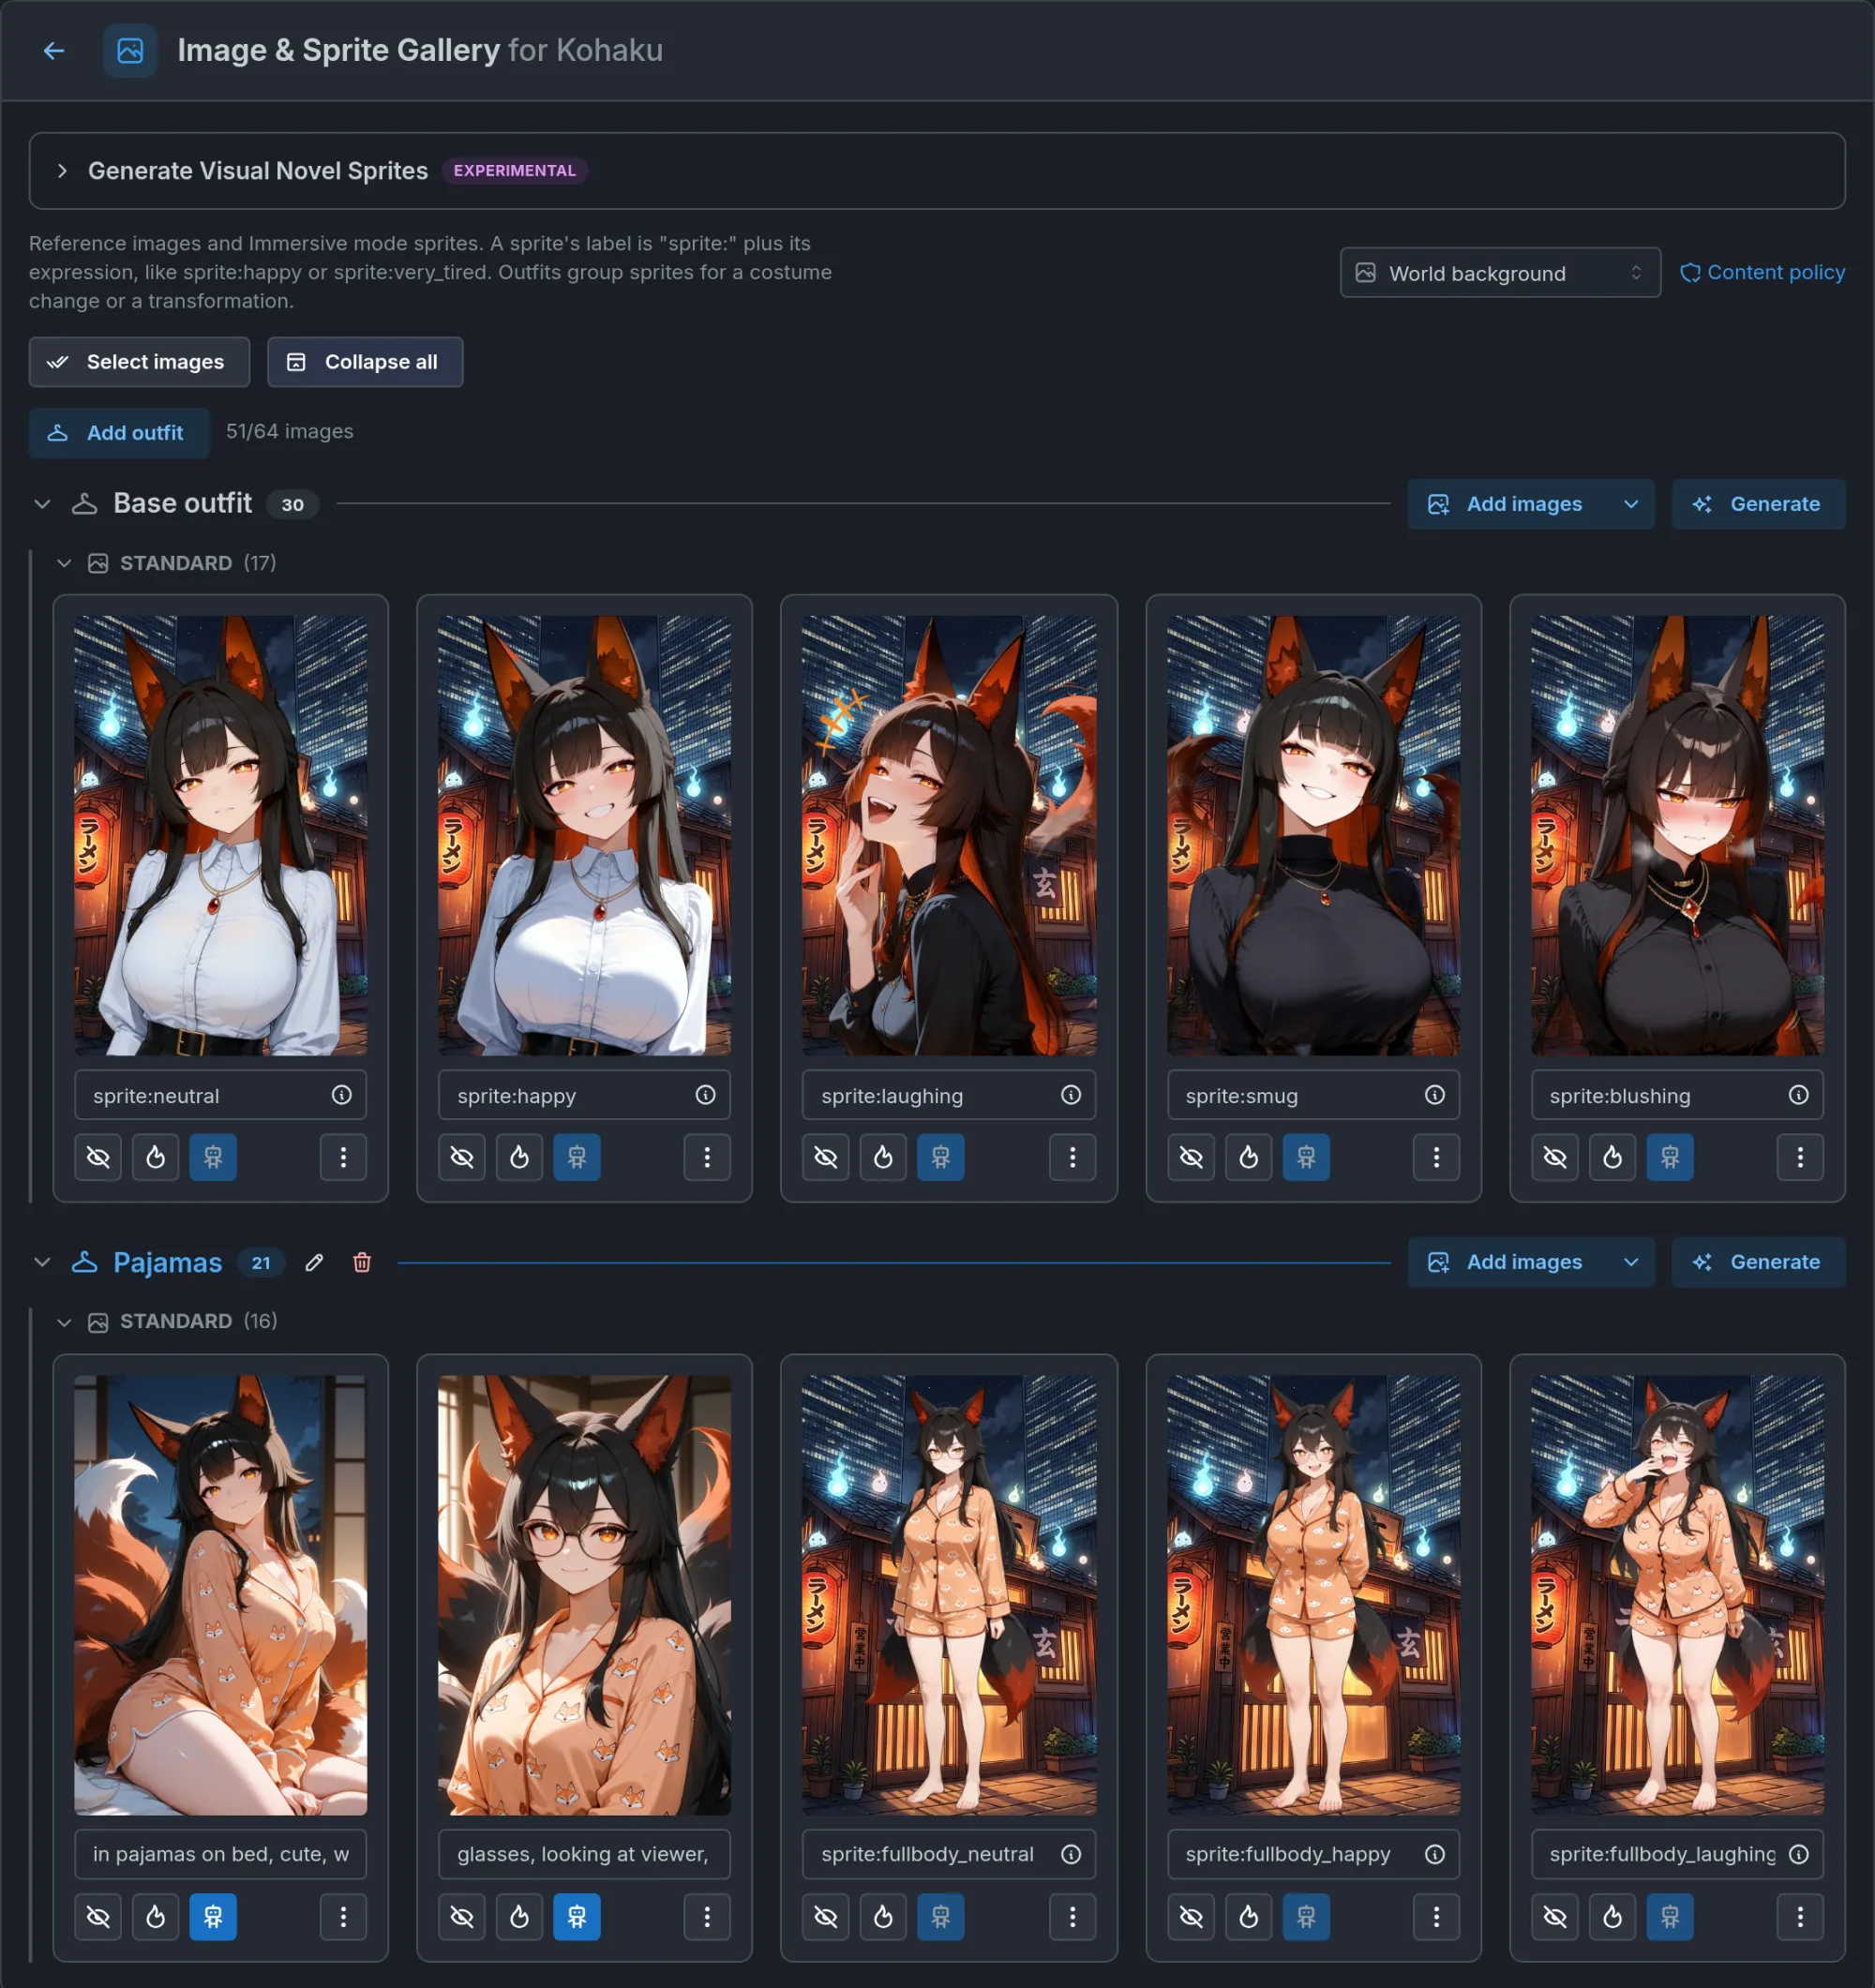
Every player character and NPC has a portrait (the avatar) and an optional gallery of extra pictures: outfits, moods, key scenes. The gallery opens from the character's form with Image & Sprite Gallery and is its own screen. Galleries do more than look nice.
- Portraits appear in the cast panel, in texting threads, and on the public cast card. Portrait, roughly 2:3, cropped by the editor unless it is already close to that shape.
- Labelled gallery pictures can be shown by the storyteller at moments that earn it (a character's entrance, a reveal, a transformation), or forced by a beat's Show character image effect. A beat's Change character portrait effect can also make one the character's portrait from a story moment on. Label each picture for the situation it fits ("battle outfit", "wounded"), because the label is what the storyteller reads. Next to the label, each picture has three toggles: hidden from players until its moment, NSFW (adult pictures only show on adult journeys), and whether the picture is exposed to the storyteller at all (sprites always are). The rest sits in the picture's menu (the ⋮ button). A picture changed since the world was last saved (a new picture, a new label, a flipped toggle, a move to another outfit) has Revert to saved in that menu: it puts back the saved version of that one picture and leaves the rest of your edits alone. On phones, thumbnails are three to a row and tapping one opens its controls in a bottom sheet.
- Sprites are the character visuals that change with the scene in immersive mode.
Sprites
A sprite is a gallery picture labelled sprite or sprite: followed by a state, such as sprite:happy, sprite:angry, or sprite:worried. The editor suggests a standard set of states (neutral, happy, laughing, smug, confident, intimidating, blushing, seductive, sad, crying, angry, scared, surprised, worried, pout, sleepy), and custom states are fine. Adult sprites are labelled sprite:nsfw_ plus the state, such as sprite:nsfw_happy, and switching a sprite's NSFW toggle renames its label to match (on adds nsfw_, off removes it), so an adult sprite never shares a label with the regular sprite of the same mood. A label ending in a number, such as sprite:neutral_2, is an alternate take of the same state: it counts as that state, and the stage picks one of the alternates each turn, so a character does not hold the exact same picture through a long scene.
Sprites must be transparent cutouts. A flat picture with a sprite label stands on the stage as a rectangle. The recommended way to build a set is the guided flow below, which makes one clean base per outfit and draws every mood from it. The older Generate Visual Novel Sprites panel is still there: it renders a full set of expressions for a character at a few credits each and keeps only the ones that succeed, with full-body versions and custom poses as options. For pictures you already have, remove the background in the gallery with Remove background (one picture from its menu, or several at once, with a choice of cutout methods).
Making a sprite set from a base (Beta)
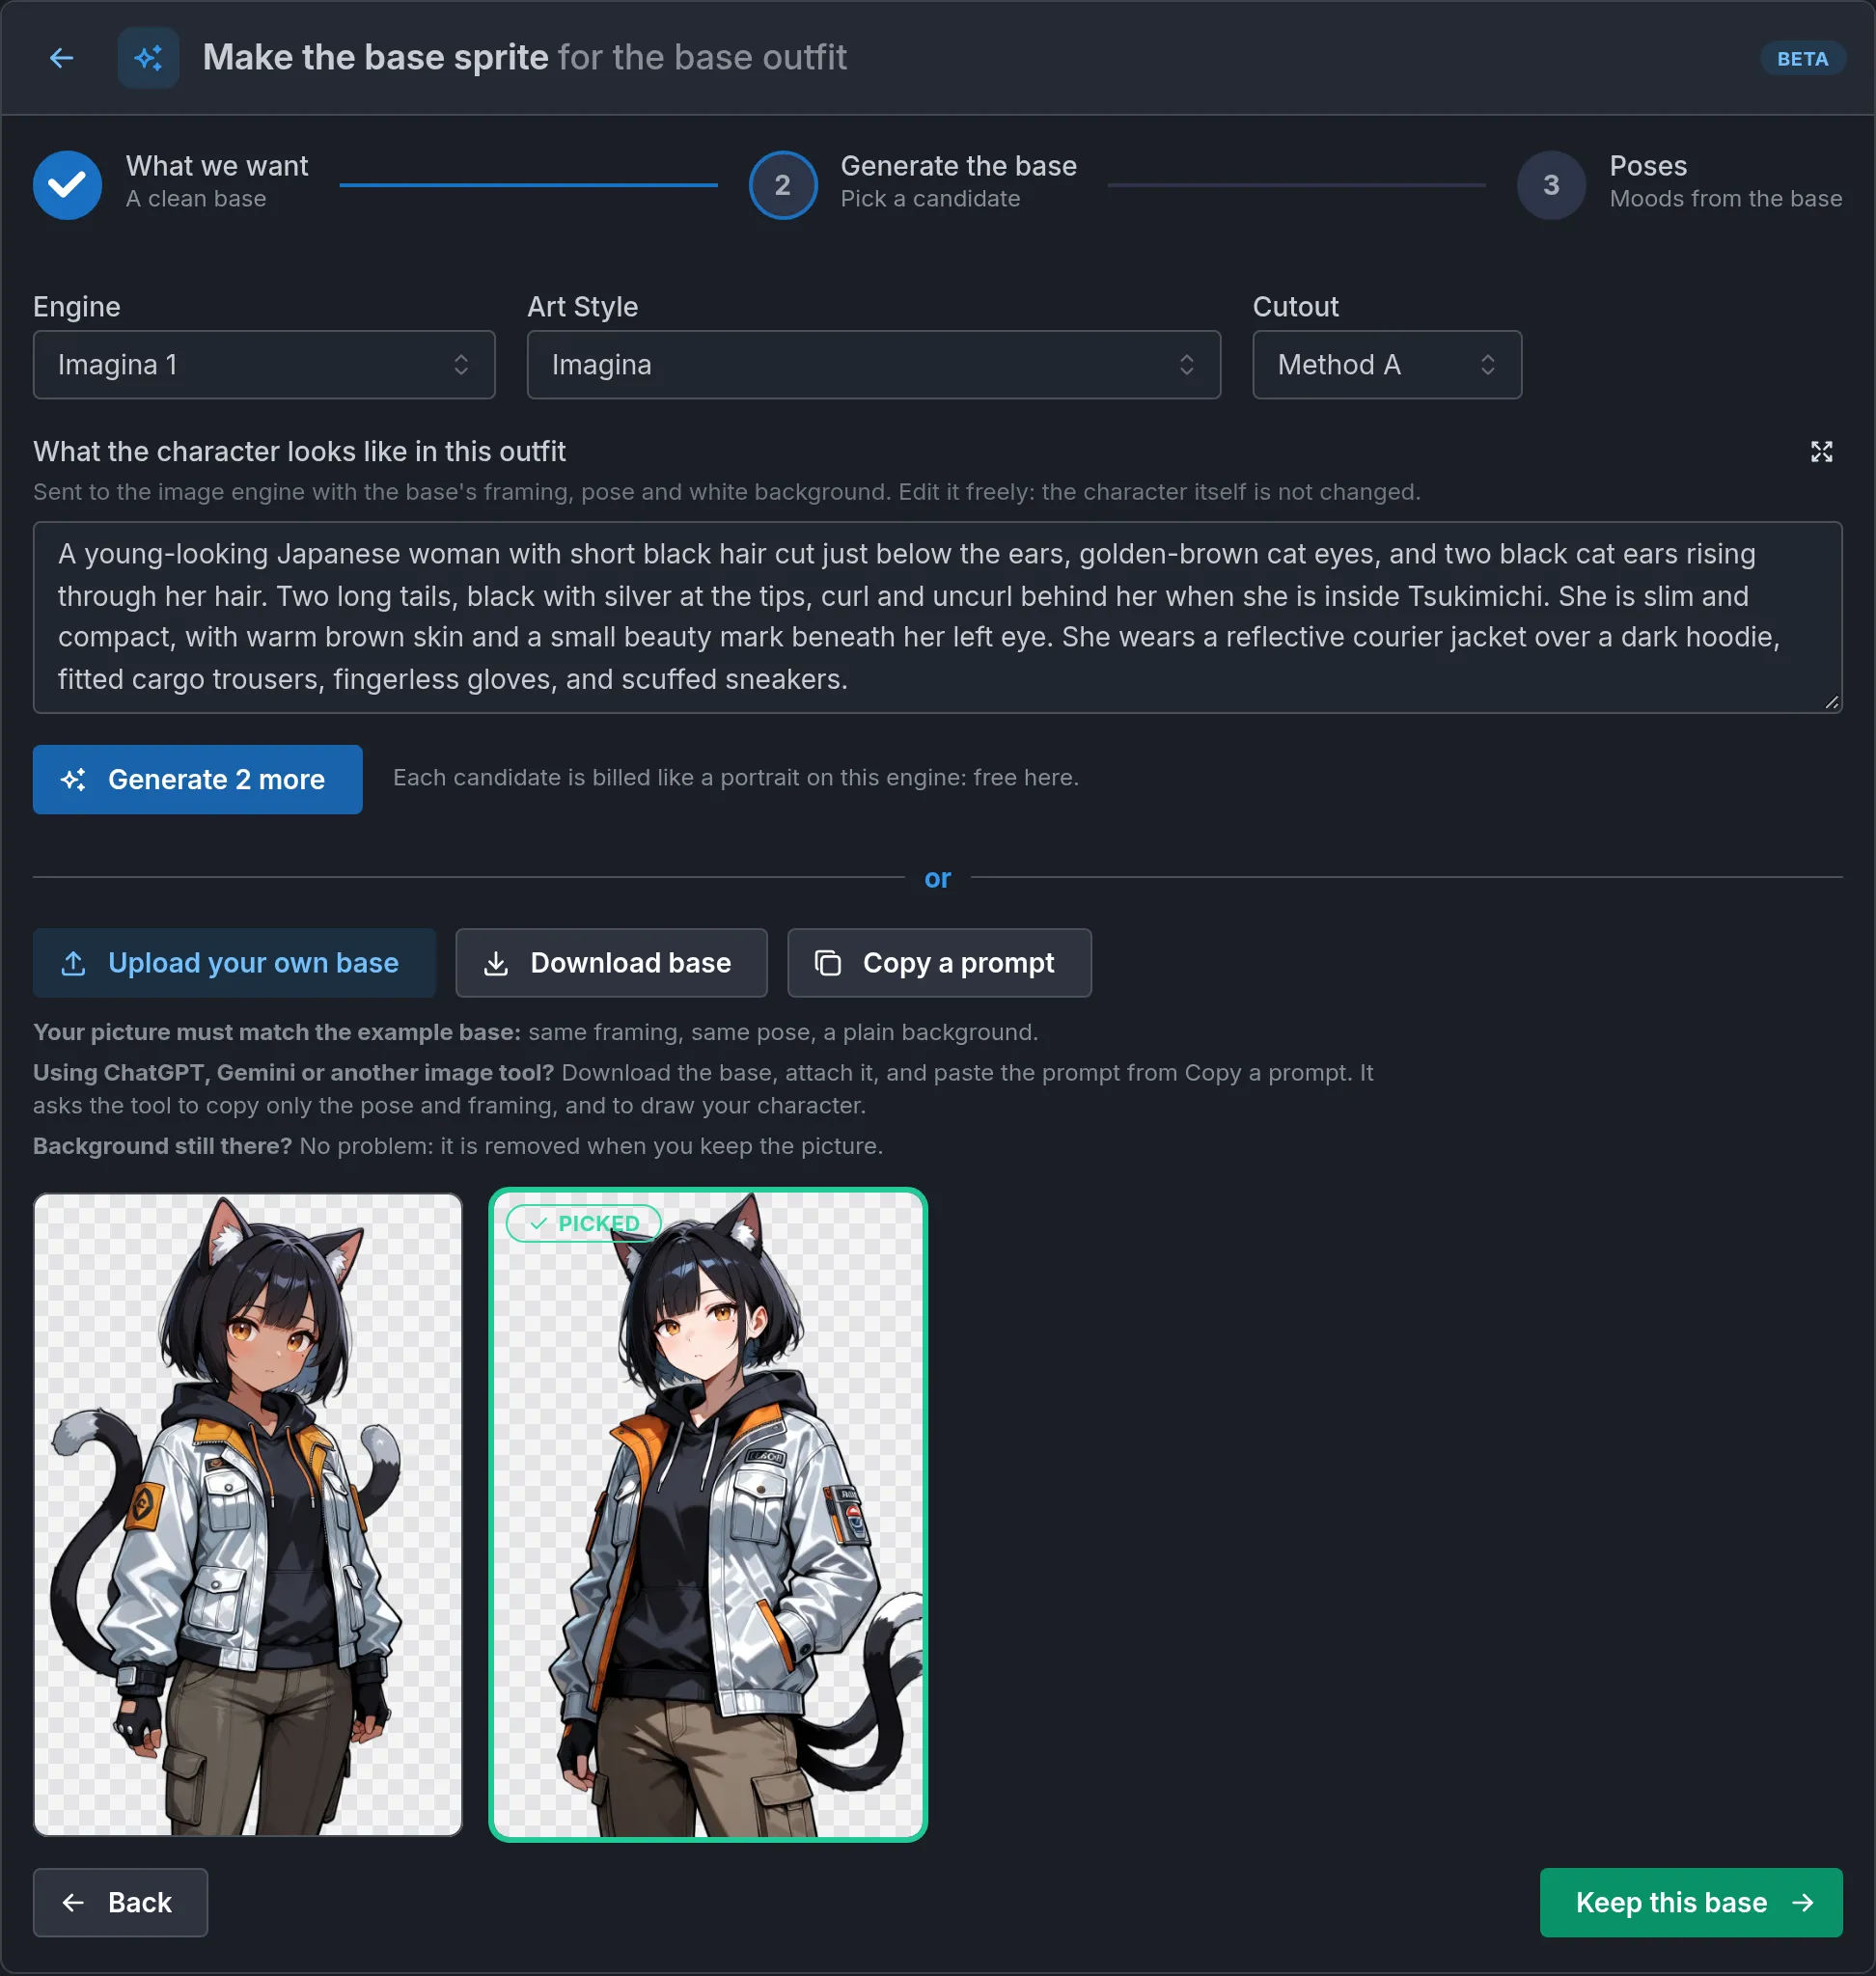
In the character's Image & Sprite Gallery, every outfit's grid (the base outfit included) ends with a dotted Generate… card, marked Beta. The idea: one clean base picture per outfit, and every mood sprite of that outfit is drawn from it as a single edit, so the character, outfit and framing stay the same and only the expression and pose change. A clean base gives clean sprites.
For an outfit without a base yet, the card opens a three-step page.
- What we want shows an example base and the rules: framed from the top of the head to mid-thigh (rendered that way, never cropped from a full-body picture), eye level facing the viewer, a calm neutral face, a plain white background, empty hands. No cup, fan, phone or weapon: props break the mood edits.
- Generate the base: pick an image model (Imagina 1 by default, also Krea, Mirae and Mirae 2) and an art style, adjust the description of the character in this outfit if needed, and generate two candidates at a time. Each candidate is billed like a portrait on that model (free in the world builder within the hourly free image allowance where the model is free). Pick one with Keep this base. You can upload your own picture instead, as long as it matches the example (same framing, pose, plain background). For a picture made with another tool such as ChatGPT or Gemini, Download base saves the example picture to attach, and Copy a prompt copies a ready English instruction asking that tool to copy only its pose and framing and draw your character. An upload that still has a background has it removed when you keep it (the normal remove-background cost applies). The kept base becomes that outfit's
sprite:neutral. - Poses: six moods are preselected (smug, happy, blushing, seductive, angry, sad) and you can tick others. Moods the outfit already has are ticked and greyed out (hovering one says to delete the existing sprite from the gallery to regenerate it). Each mood is generated from the base at the usual per-sprite price and lands in that outfit. The moods generated during this visit are shown under the checkboxes with a delete button, so a bad result can be thrown out and generated again right away. The Generate button only shows while a ticked mood is still missing. You can skip this step.
For an outfit that already has a sprite:neutral, the card reads "Make more moods of this outfit from its base sprite." and the page opens directly on Poses, drawing the moods from that picture. The existing base is shown next to the example picture, labelled "The reference", with a warning to make sure it matches the reference's pose, because mood edits work best from a base in the example pose. To make a new base instead, go back to the gallery and rename the sprite:neutral picture to something else, or delete it. A tip on the page says the same.
The flow makes no adult content. As with the rest of the gallery, save the world to keep the new images.
How sprites appear in play. The stage picks a sprite from the character's mood in the prose, every turn, on its own. A character who just got bad news shows their sad sprite. Nobody selects anything by hand.
Outfits
A character can have several outfits: a base look plus alternates such as "maid uniform", "armor", or "fallen". Each outfit has a name, an optional description the storyteller can use to dress the character and describe them even without an image, optional image tags, optional body tags, and its own group of sprites. Image tags describe what the outfit wears (a red coat, a maid apron). Body tags describe what the outfit changes about the body itself: horns, wings, skin color, a transformed silhouette. The difference matters for adult worlds, where clothing tags are dropped from nude sprites while body tags stay on them.
The gallery is organized by outfit. Each outfit is a collapsible section headed by its name and picture count, with its own Add images (upload, or pick from the Image Lab) and Generate buttons, so new pictures land straight in that outfit. Generating from an outfit's section starts from the character's appearance plus that outfit's description and tags. Inside an outfit, adult pictures sit under their own NSFW heading. Add outfit creates a new outfit from the gallery, and a picture's menu has Move to another outfit for one that landed in the wrong place. Once a character has an outfit besides the base one, the gallery opens with every outfit collapsed, and Collapse all / Expand all toggles them.
During play, the stage matches the character's current clothing against the outfit names and tags and shows the right sprite group. For NPCs, the stage also reads each on-stage character's outfit and body form straight from the prose every turn, and that reading wins when it is confident, so an NPC who changes clothes in the narration switches sprites even if their recorded clothing lags behind. Either way, a recognizable outfit name is what makes an outfit show up. A story beat's Set character outfit effect switches a character into an outfit deterministically at the moment you choose. See Beats and story arcs.
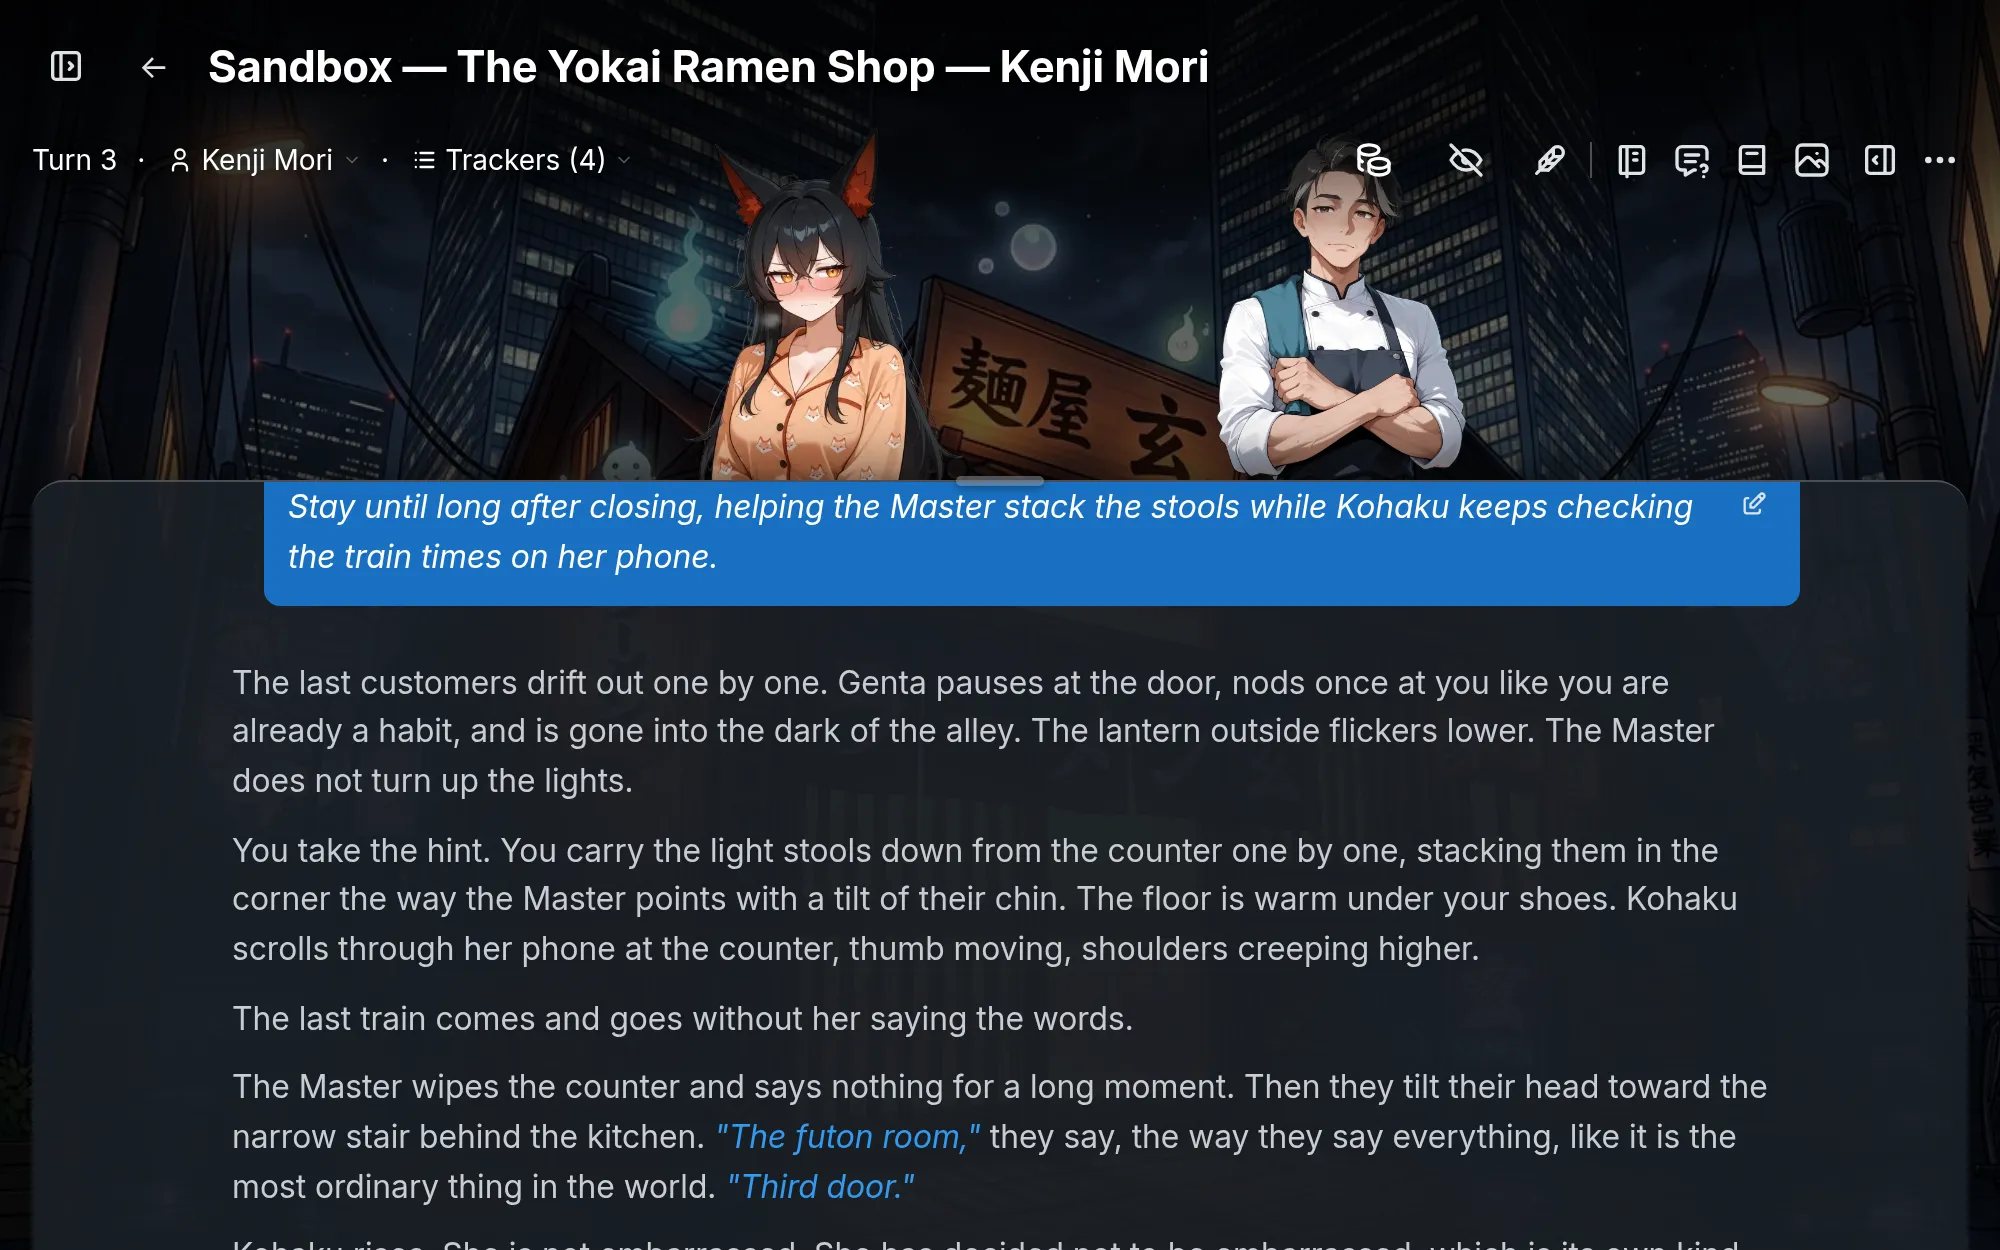
Immersive mode
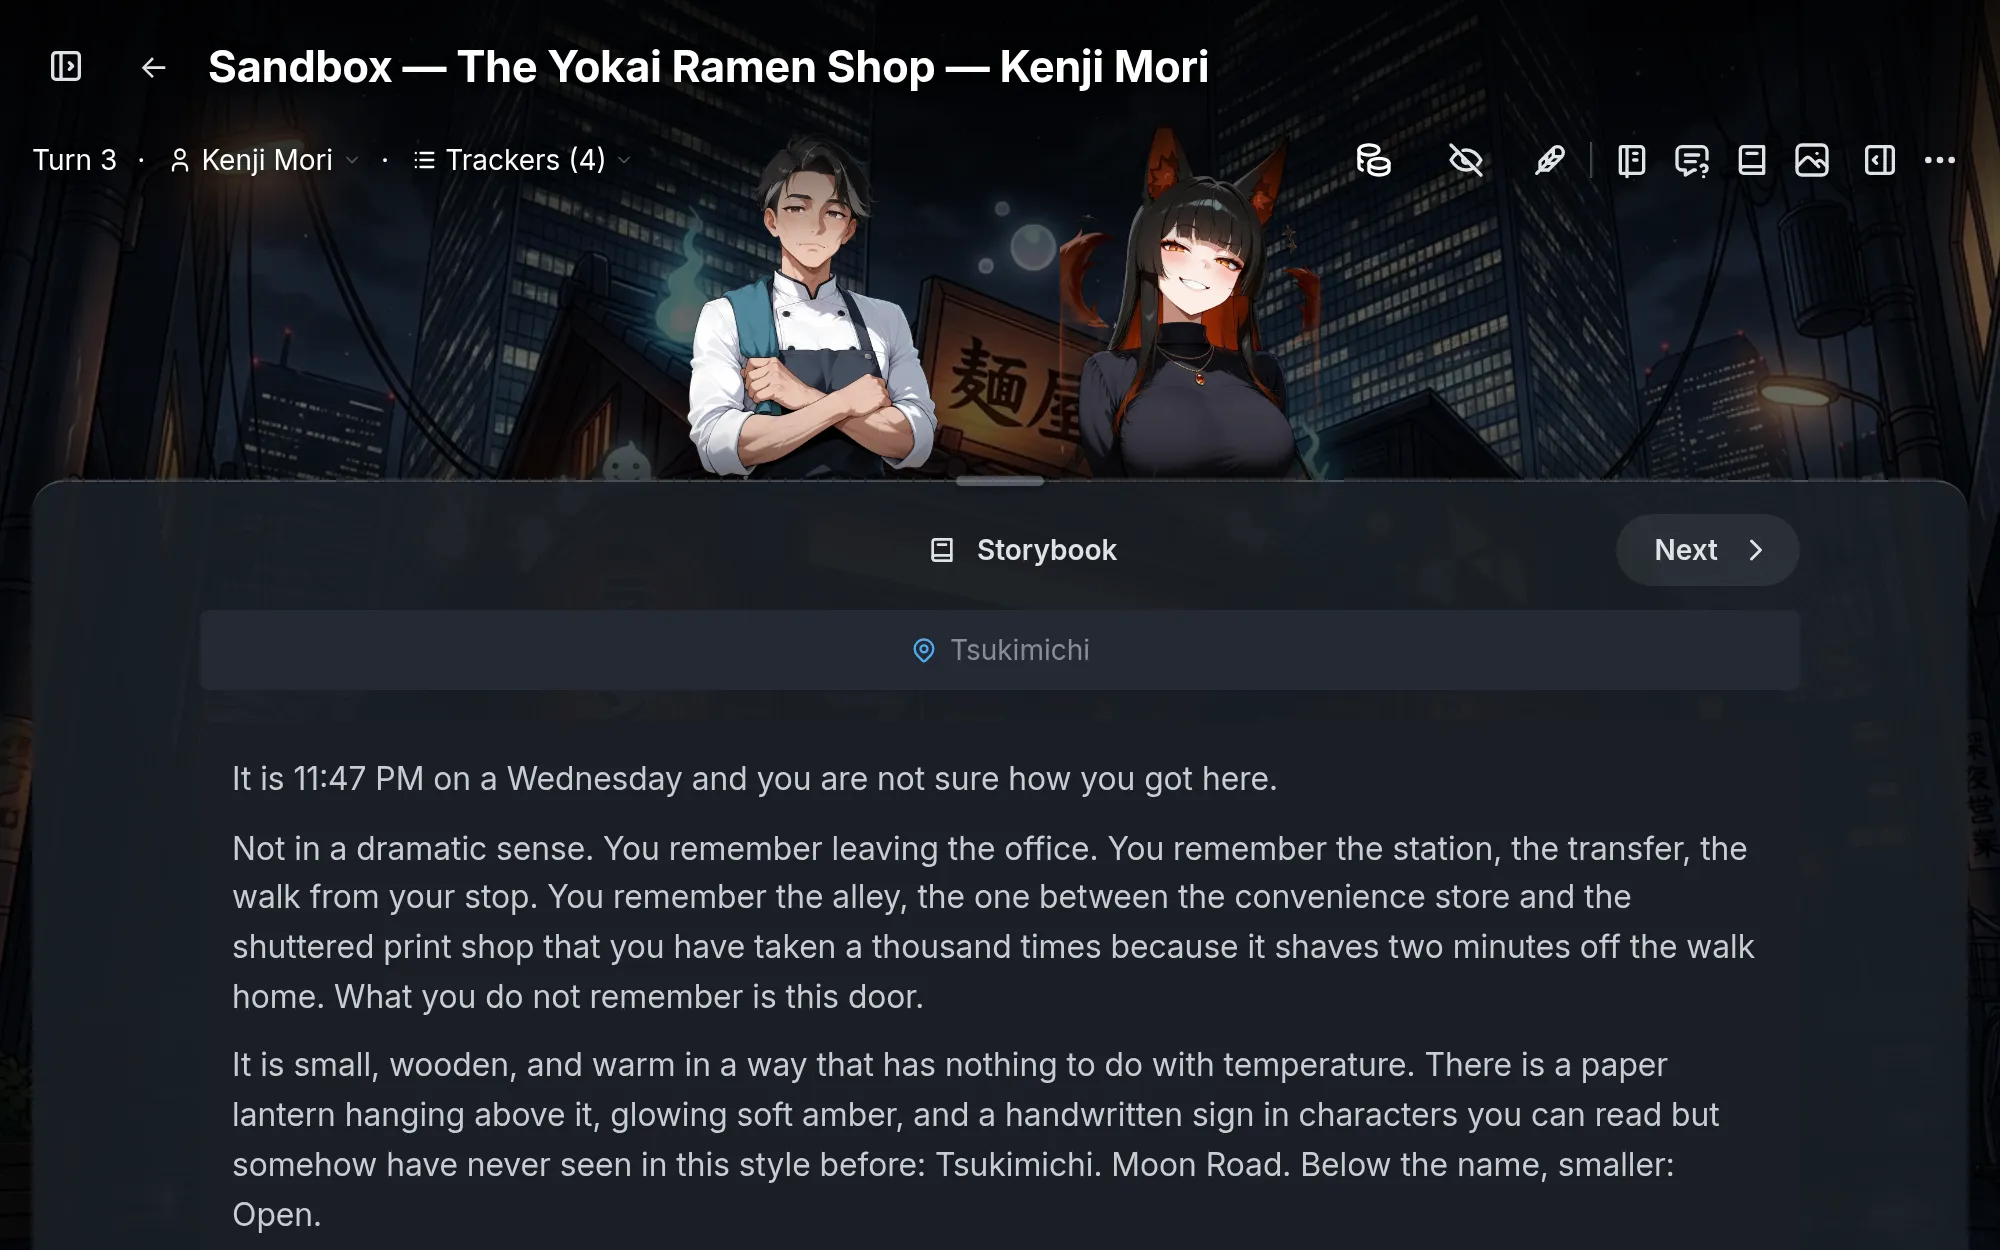
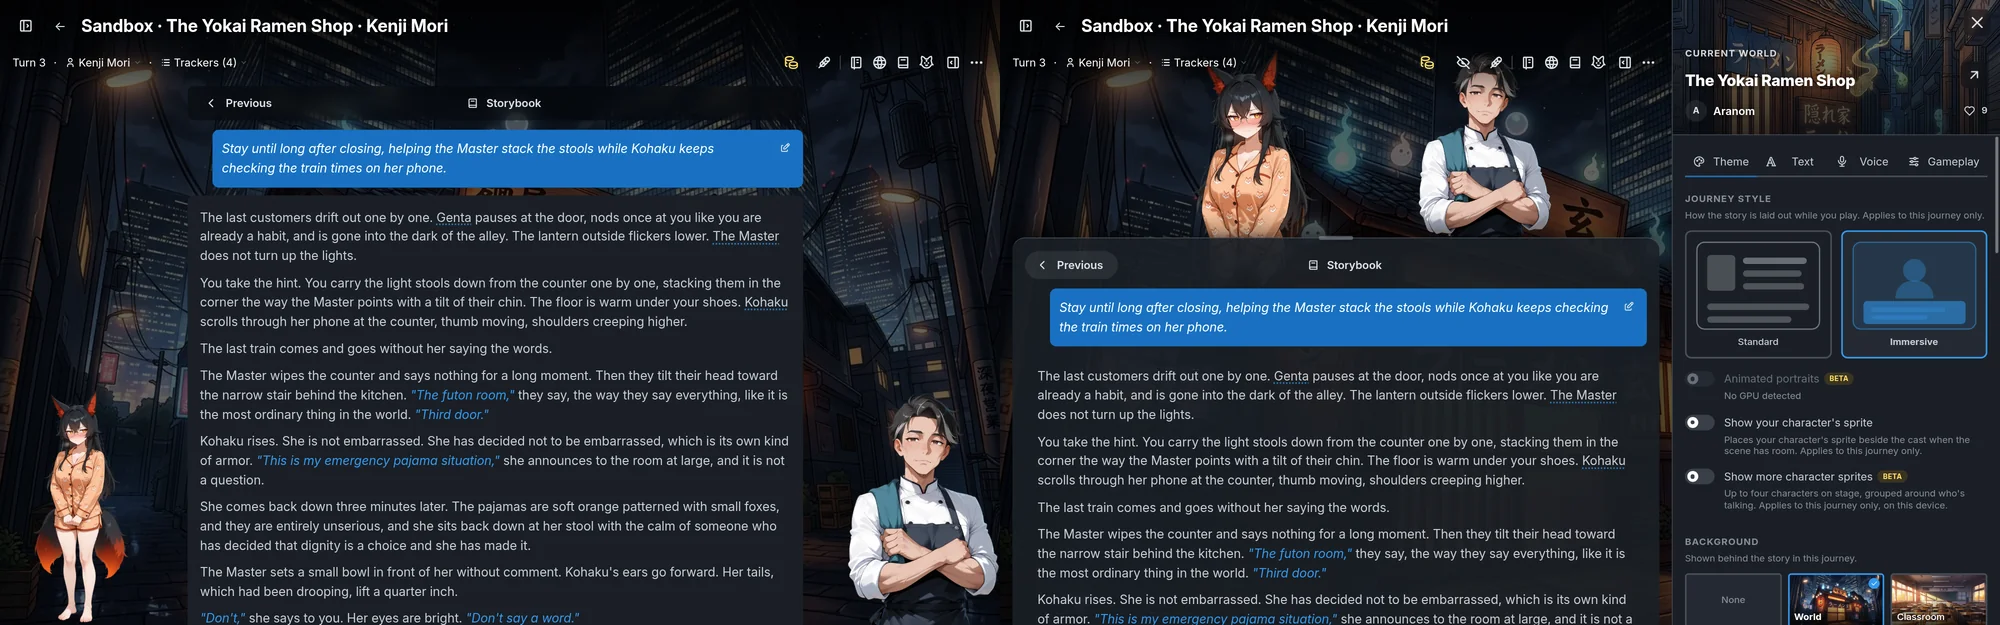
Immersive mode is a visual-novel presentation players can pick for their journey: character sprite cutouts standing on stage over your world background, with the dialogue in front. Expressions follow the story, location backdrops swap as the scene moves, and key moments can spotlight a character with authored art. It is a view, not a different game. Players can switch between the immersive stage and the reading view mid-journey, and their trackers, memory, and story continue either way.
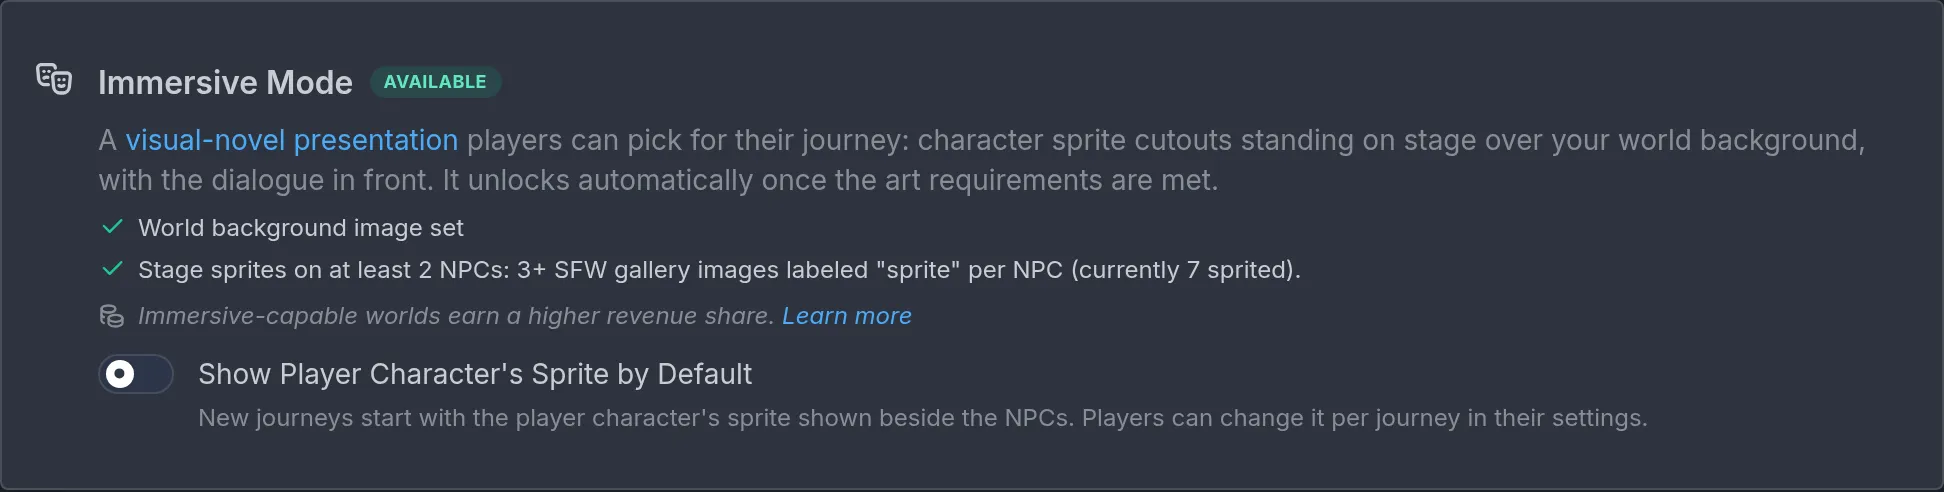
It is not a toggle. Immersive mode unlocks on its own once the art is ready, and the Immersive Mode row under Images & display shows whether it is available and what is missing:
- A world background image.
- Stage sprites on at least 2 NPCs (1 on a 1-on-1 world), each with 3 or more non-adult gallery pictures labelled as sprites. Player characters that appear as NPCs when not picked count too.
One switch is yours: Show Player Character's Sprite by Default shows the player's own sprite beside the NPCs in new journeys, once a player character has sprite images. Players can change it per journey.
The revenue share incentive. Worlds that support immersive mode earn 15% of paid turns by other players, up from the standard 10%. The bonus is based on the world qualifying, not on how each player chooses to view it. That is the reason to invest in the visual layer. See How does creator revenue share work?.
Importing media
Bringing your own pictures in, whether commissioned art, photos, or Image Lab renders.
- Formats: JPEG, PNG, or WebP. Everything is stored as WebP.
- Size: up to 12 MB per file (20 MB for maps). Very large images are refused rather than silently shrunk.
- Shape: title cards and portraits are portrait slots, roughly 2:3. Backgrounds and location images are 16:9 landscape. A picture already close to its slot's shape (within about 20%, so a 2:3 portrait, or the 3:2 landscape Imagina's own generators produce) gets a Keep the whole image switch in the crop dialog, on by default: the picture is stored uncropped at its own shape, only scaled down to fit the slot if it is larger, never enlarged. Switch it off to crop as before. A picture further from the slot's shape (a square in a 16:9 slot, say) is cropped to the slot with a box you drag. Extra images are scaled to fit and gallery pictures keep their own size. Transparency survives only on gallery pictures, which is where sprites live, and on Codex entry pictures, so an item cut-out stays a cut-out. Generating elsewhere? Ask for the slot's shape, because a picture at the wrong shape gets cropped or letterboxed, and faces are usually what is lost.
- Maps: the one slot with its own rules. A map is kept at its own shape, never cropped, and scaled down only if it is larger than 4096 pixels on a side. Players zoom in, so upload the sharpest version you have.
- Hosting: Imagina hosts everything you upload.
- Import or generate? Import when you have a specific image in mind. Generate when you want a picture from the story's own context, or when you want a whole sprite set quickly.
Best practices
- Story first. If an image or effect does not add to the moment, skip it.
- Accessibility. Players can disable text animation, turn off automatic images, and switch on a discreet mode that hides every picture. Make sure the story works without the visual layer.
- Consistency. Keep one art style across the cover, portraits, and sprites. A cover in one style and portraits in another feels disjointed, and the world-level art style setting exists to keep them aligned. Turn images follow the engine and style each player picks, so steer them with image guidance.
- Credits. Turn images cost credits per image. Use the cooldown and image guidance so illustrations land on the moments that deserve them.
- Sprites are cutouts. A rectangle on the stage breaks the illusion. Always remove the background.
Frequently asked questions
RPG mode and dice
Learn how to use RPG mode to add stats, gear, abilities, and dice to your Imagina world. Covers character sheets, LitRPG systems, and how to keep mechanics in service of story.
Badges
Every badge on Imagina, what it means, and how it is earned. Identity badges, creator milestones and player milestones, with the art for each one.